
Confidence at the sewer hookup comes from a methodical sequence, not years of cross-country travel. Still, pulling up to that concrete pad with an impatient line of rigs idling behind you can make anyone’s palms sweat. If you want to know how to look like an expert at the RV dump station, the secret is simply preparing your routine before you ever touch a valve cap.
It is completely normal to dread this chore. The fear of messy spills, touching contaminated wastewater, or mixing up your valve order can feel daunting, especially on your first trip. You don’t have to guess your way through it. By mastering proper hookup sequencing, spill prevention, and campground etiquette, you can empty your holding tanks cleanly, quickly, and without a second thought.
Ahead, we break down the essential gear you need, the foolproof black-then-gray valve sequence, and the tidy habits that keep your camper smelling fresh all trip long.
Key Takeaways
- Pull forward promptly and save non-dumping chores for your campsite to keep the line moving and earn fellow campers’ respect.
- Equip your kit with must-have tools like heavy-duty hoses, clear bayonet elbows, and accordion supports for a gravity-assisted, spill-free flow.
- Follow the golden rule of dumping black waste before gray water to understand how to look like an expert at the RV dump station.
- Rinse and recharge holding tanks safely using non-potable water lines while keeping waste valves open during active flushes.
- Solve minor line airlocks and stiff valve handles on the fly, or choose an RV delivery service to skip the dump station altogether.
Dump Station Etiquette: The Unwritten Rules Veteran Campers Follow
Campground dump stations can get hectic on Sunday mornings. Long lines test everyone’s patience. Understanding unwritten station etiquette is truly how to look like an expert at the RV dump station, because courtesy and clean habits stand out immediately. Seasoned travelers focus on two primary goals: keep the queue moving smoothly and leave the station spotless for the next camper.
Approaching the Line and Staging Your Rig
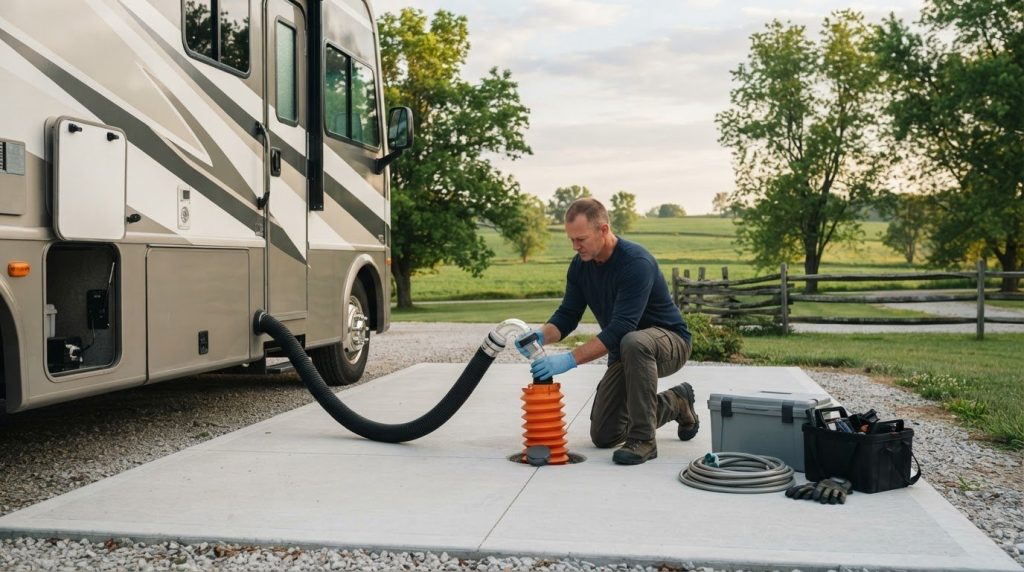
Before rolling forward, scout the sewer inlet location on the concrete pad. Align your RV waste outlet as close to the ground drain as safely possible. Always leave plenty of forward clearance and turning radius for departing rigs ahead, especially in tight state park loops. Once positioned, cut your engine and set the parking brake firmly.
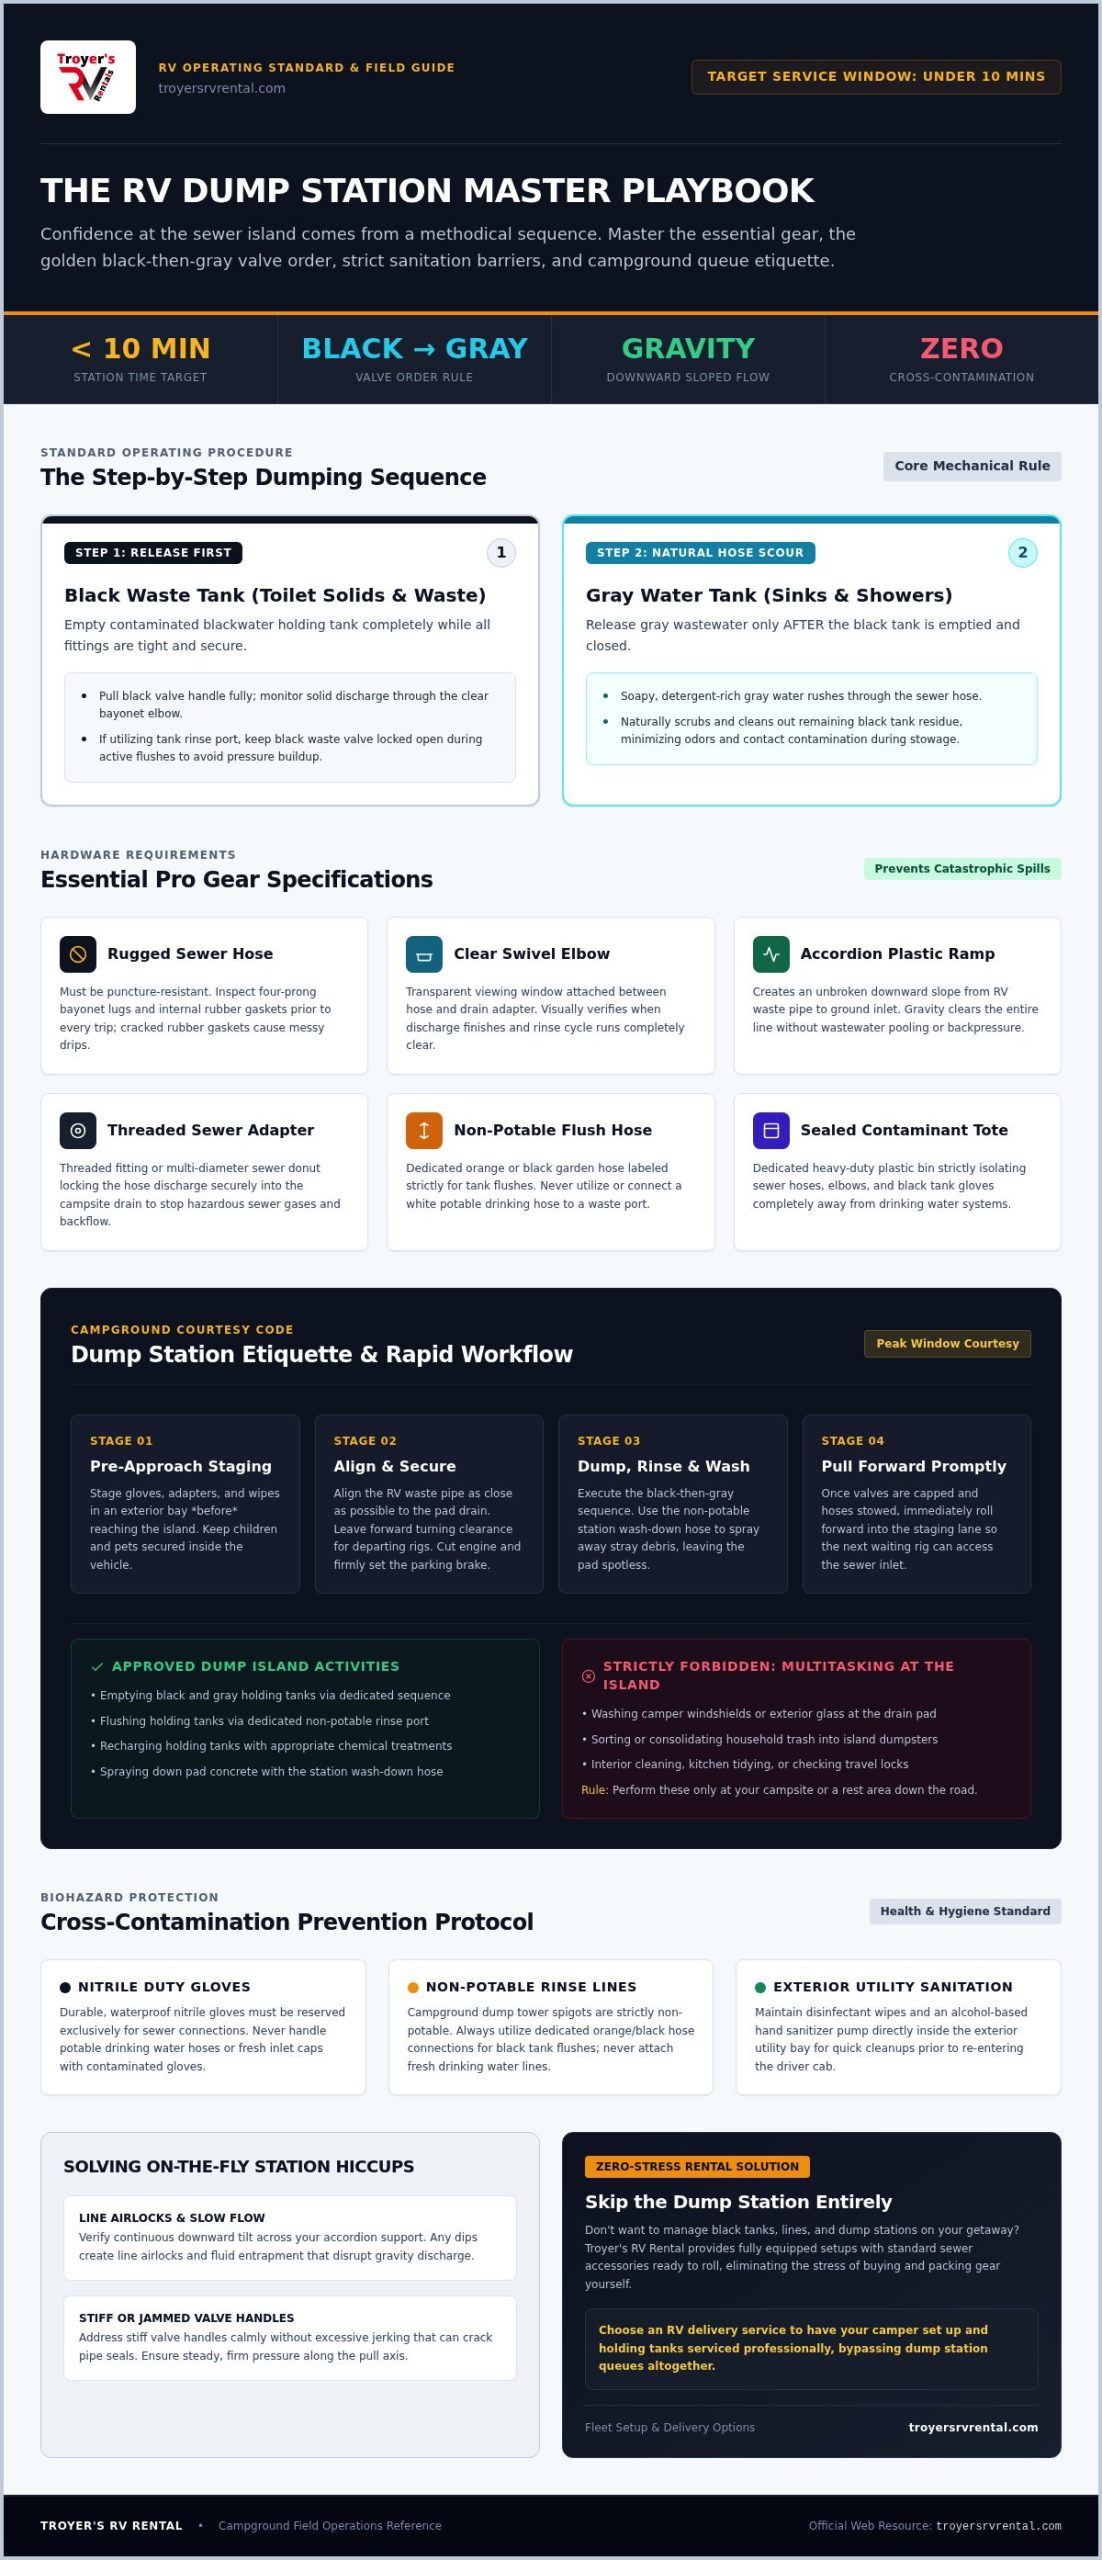
Preparation makes the difference between a clumsy fumble and a smooth stop. Stage your supplies before you pull onto the active island. Keep your heavy-duty gloves, sewer elbows, and sanitizing wipes ready in an easily accessible exterior storage bay. Keep young children and pets secured inside the vehicle throughout the process. A crowded dump bay is no place for distractions, especially while transferring contaminated blackwater waste from holding tanks into municipal drains.
Time Management and Station Consideration
During peak checkout windows, aim to wrap up your dump and rinse cycle in under ten minutes. The active sewer pad is strictly for holding tank maintenance. Never treat the dump island as a multi-tasking pit stop. Save windshield washing, household trash sorting, and interior tidying for your original campsite or a highway rest area down the road.
Efficiency keeps campground tempers cool. As soon as your valves are closed, capped, and your hoses are securely stowed, pull your vehicle forward into a staging lane. You can double-check travel locks and grab a cold drink once the rig behind you has access to the drain. Offer a quick, friendly nod to waiting drivers to keep spirits high. Before stepping back into the cab, use the site wash-down hose to spray away any stray debris. Leaving the concrete pad immaculate is the simplest sign of how to look like an expert at the RV dump station.
Essential Dump Station Gear: What Real Pros Keep in Their Kit
You cannot run a smooth operation with cheap, leaky equipment. Tank treatments break down solids, but durable physical hardware does the heavy lifting. Equipping your rig with the right components is fundamental to how to look like an expert at the RV dump station. High-grade gear prevents catastrophic leaks, protects your health, and guarantees a rapid workflow.
Sewer Hose Anatomy and Connections
Start with a rugged, puncture-resistant sewer hose. Check the four-prong bayonet lugs and internal rubber gaskets for wear before every trip; a cracked rubber ring invites messy drips. Attach a transparent swivel elbow fitting between the hose and the sewer adapter. This clear window lets you visually confirm when tank discharge finishes and when rinse water runs clear, which is key to a hassle-free dump station experience.
Always support your line with an accordion-style plastic ramp. Ground drains rarely sit level with your RV waste pipe. This plastic track creates an unbroken downward slope so gravity clears the line without pooling. Fasten the discharge end into the campground inlet using a threaded adapter or multi-diameter sewer donut to keep sewer gases and backflow locked tight.
Hygiene, Gloves, and Cross-Contamination Barriers
Sanitation separates seasoned RVers from messy novices. Pack durable, waterproof nitrile gloves designed strictly for black tank duty. Never cross-contaminate your freshwater setup by touching drinking hoses with dirty gloves. Here is how pros organize their exterior kit:
- Sealed Waste Tote: Store your sewer hose, clear elbow fittings, and dump gloves in a dedicated, sealed plastic bin isolated from fresh water filters.
- Dedicated Black Flush Hose: Carry an orange or black garden hose labeled exclusively for non-potable flushing duties. Never connect a white potable drinking hose to a tank rinse port.
- Sanitation Station: Keep disinfectant wipes and an alcohol-based hand sanitizer pump right inside your exterior utility door for quick cleanups.
Reliable equipment keeps you confident. If you are hitting the road in a camper or motorhome rental from Troyer’s RV Rental, you will find fully equipped setups with standard sewer accessories ready to roll, eliminating the stress of buying and packing gear yourself. With clean, dependable tools organized in your bay, knowing how to look like an expert at the RV dump station becomes second nature.
The Step-by-Step Dumping Sequence: Black Tank First, Gray Tank Second
Every smooth dump operation follows a deliberate, chronological sequence. Knowing which valve to pull and when is the true test of how to look like an expert at the RV dump station. The golden rule is simple: black tank first, gray tank second. This exact order uses your soapy shower and dishwater to thoroughly scrub out the sewer hose, keeping foul odors from sticking around.
Connecting and Securing the Run
Always connect your hose to the ground sewer drain before touching the rig. Thread the drain adapter firmly into the campground hole. Unfold your accordion ramp, setting a continuous downward angle toward the inlet to prevent standing liquid bellies. With the ground anchor secured, remove the RV dump cap and twist your bayonet fitting onto the waste pipe until the locking tabs click tightly into place.
Executing the Valve Pulls
Now comes the main event. Reach under the service bay and locate the larger gate valve, which controls the toilet waste. As highlighted in Winnebago’s beginner guide to dump stations, managing tank velocity is essential for a complete drain. Pull the black valve open with one swift, decisive motion. A wide-open gate creates maximum scouring rush, carrying heavy solids out through the transparent elbow.
Watch the clear fitting until wastewater stops flowing completely. Push the black gate valve all the way closed until you feel it seat firmly. Next, pull the smaller gray water valve handle. Soapy sink and shower water will surge through the entire line, washing out residue left behind by the black tank run. This self-cleaning step keeps your hose surprisingly fresh.
Closing Valves and Preventing Unpleasant Surprises
Finish your routine with care to avoid messy drips. Follow this orderly checklist before unhooking:
- Seat Both Gate Valves: Double-check that gray and black valve handles are fully pushed closed against their rubber seals.
- Walk the Hose: Disconnect the bayonet fitting from your RV outlet, then slowly lift the hose section by section toward the ground inlet to drain any lingering rinse drops.
- Cap the Outlet: Snap your RV waste outlet cap back into position before unscrewing the adapter from the station drain.
Following this precise, repeatable sequence eliminates guesswork. You will protect your rig, avoid embarrassing drips, and demonstrate how to look like an expert at the RV dump station every single time.
Flushing, Rinsing, and Recharging Your Holding Tanks
Draining the waste is only half the battle. If you pack up your hoses without rinsing the black tank and recharging it with liquid, you invite foul odors and stubborn sensor faults on your next outing. Resetting your plumbing properly is another hallmark of how to look like an expert at the RV dump station. A thorough rinse keeps internal walls clean and your camper smelling fresh.
Operating Black Tank Flush Systems Safely
Modern rigs often feature an integrated tank flusher inlet. Hook up your non-potable utility hose to the flush connection on the RV service panel. Double-check that your black waste valve is wide open before turning on the campground spigot. Running external water into a sealed holding tank can cause catastrophic back pressure or internal toilet geysers. Keep the black valve open the entire time water runs.
Turn on the faucet and let the rotary spray nozzles scrub the tank walls. Watch your clear elbow fitting. You will see dark sludge turn into cloudy water, followed by a stream that runs completely clear. Shut off the spigot, let the hose finish draining, and push the black gate valve closed.
Recharging Tanks with Water and Digester Treatment
Never leave a black tank bone-dry during active camping trips. Dry tanks cause waste to stick to the plastic floor, creating solid pyramids that block valves. Once your valves are closed, head inside the camper to prime the system:
- Fill the Basin: Depress the toilet pedal to run roughly two gallons of water into the toilet bowl and let it flow down into the tank. This liquid cushion covers the bottom floor completely.
- Drop in the Treatment: Add a manufacturer-recommended holding tank enzyme or digester pod directly into the bowl and flush it down.
- Protect Campsite Flow: During multi-day stays, keep both holding tank valves closed until tanks hit at least two-thirds capacity. Storing liquid builds the hydraulic rush needed for clean drains.
These simple reset habits protect internal sensors and eliminate bad smells. If you are planning an Ohio getaway and want the adventure without the maintenance, consider using camper rentals with delivery options from Troyer’s RV Rental. Our team provides clear orientations and can even handle delivery and setup directly at your campsite. Learning how to look like an expert at the RV dump station gives you full control of every mile.
Troubleshooting Station Hiccups and Stress-Free Rental Options
Even seasoned travelers encounter equipment snags from time to time. Hoses can develop airlocks, valve gates can stick, and couplers can leak. Staying cool and resolving these minor field problems without panicking is truly how to look like an expert at the RV dump station. With a practical mindset and basic mechanical awareness, you can solve common issues in seconds.
Handling Clogs, Sluggish Flow, and Minor Spills
If you open a waste valve and nothing moves through your clear elbow, do not panic. Sluggish flow often stems from a simple airlock in a sagging hose accordion. Gently lift the center sections of your sewer hose to encourage liquid downward toward the ground hole. If waste is trapped behind the gate, using a reverse flush valve adapter or pouring warm water down the toilet can dissolve stubborn paper blockages safely.
Stiff valve handles require patience rather than brute force. Yanking hard on a stuck metal rod can crack the internal plastic gate or snap the pull cable. Work the handle back and forth with steady, gentle pressure until the rubber seal gives way. If an unexpected coupling drip occurs, keep spare silicone hose washers in your exterior kit to replace brittle seals immediately. In the event of small ground spills, spray the concrete pad with disinfectant cleaner and rinse thoroughly with the non-potable station hose.
Skipping the Station with Campsite Delivery
For beginners or busy families, managing holding tanks can feel intimidating. You do not have to tackle sewer islands alone on your vacation. Opting for a full-service delivery bypasses towing, maneuvering in tight station bays, and emptying waste lines entirely. A quality local outfitter handles the dirty work so you can focus on making memories around the campfire.
You can rent clean, fully equipped motorhomes or travel trailers from Troyer’s RV Rental. Our team provides friendly walk-through orientations for first-time campers, ensuring you feel completely confident operating every valve and accessory before you leave the lot. If you prefer to skip holding tank duties entirely, choose our campsite delivery and setup service. Discover gorgeous regional destinations in our Motorhome Rental in Ohio: Stress-Free Travel Guide 2026, and evaluate full-service campsite delivery options with our RV Delivery Cost Ohio: Your 2026 Guide to Stress-Free Setup. Whether you dump your own tanks or let our team handle setup, knowing how to look like an expert at the RV dump station ensures every road trip stays smooth and clean.
Hit the Road with Complete Dump Station Confidence
Emptying your holding tanks doesn’t have to be a stressful chore. Staging your hoses ahead of time, emptying the black tank before the gray, and recharging the system with clean water turn an intimidating task into a simple, five-minute habit. With this repeatable routine, you now know exactly how to look like an expert at the RV dump station wherever your travels take you.
Ready to plan your next outdoor getaway? Book your worry-free Ohio camper rental today with Troyer’s RV Rental! Every rental unit comes with complete sanitization kits and standard sewer equipment ready to go. Our team provides friendly, personalized walk-through orientations on all RV controls so you feel fully prepared before you head out. For the ultimate relaxing vacation, we also provide convenient campsite delivery and full setup options across Holmes County.
Pack your bags, gather your family, and hit the highway with complete peace of mind!
Frequently Asked Questions
Why must you dump the black water tank before the gray tank?
Dumping the black tank first allows the gray water to wash away residual toilet waste left inside the hose. The soapy runoff from your sinks and shower scours the ribbed inner walls of the line naturally. Reversing this sequence leaves messy black debris sitting in your hose when you disconnect, which runs counter to how to look like an expert at the RV dump station.
Can I leave my RV holding tank valves open while connected to full campsite hookups?
Never leave your black water tank valve open at a full-hookup campsite. When the valve stays open, liquids drain out immediately while heavy solids settle, dry, and form a stubborn clog at the bottom of the tank. Keep both valves closed until the tanks fill to roughly two-thirds capacity. This ensures adequate volume and weight for a clean, forceful rush when you drain.
What should I do if my RV sewer hose leaks during dumping?
Shut the active gate valve immediately to stop the flow of wastewater. Check the connection points to make sure the bayonet fittings are clicked tight and the internal rubber gaskets are not twisted. Use your dedicated non-potable hose to rinse the spill area promptly, and apply disinfectant spray to keep the pad clean. Rigs rented from our Millersburg lot come equipped with tight-fitting, inspected connections to prevent these mishaps.
How full should RV holding tanks be before dumping them at a station?
Aim to dump your holding tanks when they reach between two-thirds and three-quarters full. Draining a nearly empty tank lacks the hydraulic pressure needed to carry solids out cleanly. If your black tank is only partially full on departure morning, run fresh water down the toilet bowl before heading to the station to build up the necessary volume.
Is it safe to use campground rinse water hoses to fill my RV fresh water tank?
No, you should never use the tower rinse hose at a dump station to fill your potable drinking water tank. Those spigots and hoses often touch contaminated sewer fittings and carry bacteria. Only fill your drinking water tank from clearly labeled potable water stations using your dedicated, sanitized white drinking hose. Keeping clean lines separate from waste stations is an essential camping safety rule.
How do I keep my RV black tank sensors reading accurately after dumping?
Rinse the tank thoroughly using the built-in black tank flush port until the discharge runs clear, then prime the tank with two gallons of water and an enzyme-based digester packet. These treatments break down lingering tissue and grease that stick to wall-mounted sensor probes. Routine flushing and keeping liquid on the tank floor prevent false readings, which is a major part of how to look like an expert at the RV dump station.